Tuesday, January 31, 2012

number 4 cupcake cake

My aunt always buys these really delicuious and cute cupcake cakes for her granddaughters birthday parties. So since I always make my girls birthday cakes and cupcakes I thought I would give it a try. My daughter recently turned 4 and she wanted to have a candy themed party. So instead of making a cake with candy all over it I decided to make her the #4 out of cupcakes.

SUPPLIES
paper streamers (any color)
double sided tape
big piece of foam board (get at any craft store or WalMart/Target)
cupcake pan
cupcake papers
table or handheld mixer
large bowl
2 cake mixes (any ingred your mix calls for)
frosting (make your own or buy some at the store)

Cut your foam board into the number 4, I did mine by placing my cupcake papers on the board in the shape of a 4 (you will need to do this before you put any batter into the papers)

Now take your paper streamers and tape them to the foam board about 1/2" from the edge gathering them as you go to make it look like they are ruffled. I used lots of tape for this!!

Bake your cupcakes and once they are cooled place them on the number 4. To keep your cupcakes from sliding around while frosting them put a little frosting on the bottom of each cupcake to act like a glue and they will stay put.
this is not finished but this is what it will begin to look like


As soon as you get all the cupcakes on the foam board give them one coat of icing. Let stand a couple hours , I let mine set overnight. Once set go back through and give the cupcakes a second coat to fill in all the gaps that were left showing through after the first coat. It might help to put the frosting on over the gaps with a bag of frosting and pipe it on.

*I had initially planned on using the purple boarder around the edge and pink icing but the icing color I bought tasted awful so I had to go back through and tape a pink edge on top of my purple edge. It looked great!!

this is the finished product. someone stole a cupcake so I was short one one top but it looked great anyway.

Once the 2nd coat of frosting goes on pipe a thick boarder around the top of the cupcake cake. I did my boarder twice to get it extra thick. Then I added sprinkles to the top. Good luck with your pull apart cupcake cake!! This is such a great alternative to a regular birthday cake. Kids love these and they take less time to bake and decorate.

PS I saw one kinda like this on a cupcake website (almost the same # of cupcakes, they had 1 more than I did) for $50- a little out of my budget, I spent $10 to make mine. And mine was WAY cuter, well I think so anyway :)

simple and easy cloth diaper insert

Everyone has their own method to cloth diapering. I like to use diaper covers with a prefold insert. The inserts I use are just the plane jane old 6 ply tri fold cloth diapers you buy at Wal Mart or Target.

SUPPLIES
6ply tri fold diapers (come in 2 different size packages)
scissors
thread
sewing machine

start the diaper unfolded

fold it into thirds

place it in the middle of your diaper cover. be sure to hook your velcro laundry tabs so that the pre fold does not snag on them.

cut off whatever is hanging over the diaper cover *be sure not to cut the diaper cover itself just the pre fold

this is what the extra piece will look like. If you don't want to be wasteful and also for extra absorbency add it to the insert

place the extra piece down the center of the insert, cut off any excess if any

sew a zig zag stitch on each end where the extra peice is, there is no need to sew down all four sides

it doesn't have to be perfect, this is what it will look like

Now fold your other 2 sides in so that it encloses that extra piece on the inside. Now restitch those 2 ends

when you start and stop a stitch using the zig zag hold fabric in place for a couple seconds and stitch. this will give you a good backstitch so you won't have any unraveling threads.

this is what the back stitch will look like

And now you're done!!! super easy and doesn't take much time to do.


Friday, January 27, 2012

Babyville Boutique cloth diaper

.
I LOVE Babyville Boutique. All of you cloth diapering mommas will appreciate this. I made this diaper yesterday and it was so easy, much easier than I was expecting. And it was fairly inexpensive to make. My Joann's store just started carrying the brand Babyville Boutique, a cloth diapering line that you make yourself. If you use your coupons or buy it on sale then the cost per diaper is pretty cheap (compared to a new diaper from a major cloth diapering brand). It took me a few hours to make this one, I had to stop a lot and do my daily life in between cutting patterns and stitching.
Babyville carries everything you need for cloth diapering except any soft material you may need, for soakers, diaper lining, ect.
The diaper above is like the gDiaper. It is a cover (except mine is made out of PUL), with a hammock like thing on the inside that snaps to the cover. I lined the inside of my diaper cover with a really soft flannel (if you want your diapers to last I would opt for a flannel that isn't super cheap, sometimes the cheap ones have small holes in them or snag really easily).
Babyville's books are very affordable. At the store I go to they are $10 each and come with patterns for sizes newborn-large and have several different styles to choose from.

I am so excited about this brand. I didn't start cloth diapering till I had my 3rd child. I cloth diapered her till she was 4 months (she's now almost 8 months) and she kept getting a rash but I thought it was because we were battling thrush (hope none of you ladies get that while breastfeeding it is horrible to get rid of!!!). Once the weather cooled off and the thrush went away she still was getting diaper rashes. We took a road trip and I used disposables and the rash went away almost instantly. I washed the diapers like I was supposed to and her skin isn't sensitive for the most part so I stashed away all the bumgenius diapers (I bought used on craigslist for $10 each if I bought them new I may not have had any problems with them) that I was using and just used gDiapers with a tri fold inserts and disposables and she hasn't had any rashes since. gDiapers are a bit out of our budget so I only have a couple but I hate polluting the earth with disposables, which take over 500 years to break down. Then I came across Babyville and I was crazy excited.

I need to go get more supplies so I can post a how to on this for anyone who is interested. I couldn't believe how easy it was.

Wednesday, January 25, 2012

sneak peak of training pants

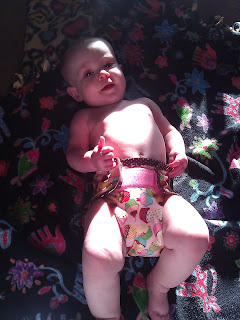
I started on my first pair of training underwear for my little girl today. They aren't finished or perfect but I believe they will get the job done. I will finish this pair today and tomorrow will post a new pair with step by step instructions and more pics. Yay I'm so excited about these!!!

So these need a little more brain work to them. I got the soaker sewn on and put them on my daughter. She peed in them and they didn't leak out the sides or the back but they did leak out the front. Not sure how that happened, thinking it was the way she was sitting so I need to do something a little different. I will come up with a new pattern, try it out then post when I get it perfected.

Monday, January 23, 2012

Welcome to my blog

Hello! I hope you enjoy and find my blog useful. I just started this so please bear with me while I work out all the corks lol. Not only will I have how-to's on crafty things like bows, tutus, fairy wands, but will also talk about the daily life of a mom. There are so many things that us moms do that only other moms appreciate. And we (well I do anyway lol) get a huge sense of accomplishment out of making things myself. Hopefully I can help some of you other mommas out there with projects or start new ones.
This week I will be attempting to make my middle daughter a pair of training undies out of a regular pair of panties she already has. I can't wait! Stay tuned to find out how that goes. Happy reading and Welcome!!!